This video demonstration highlights key mechanics and gameplay of our end of 2nd year group project: Iron Realms.
Showing posts with label Edmed. Show all posts
Showing posts with label Edmed. Show all posts
Tuesday, 10 May 2016

Tuesday, 19 April 2016
Character: Animation Skinning
After creating the skeletons for the character models, they need to be skinned so the mesh reacts to the skeletons movements.
Although this seams like an easy task, It's the part i found the most challenging as I did not fully understand the mechanics. to my understanding the colours indicate the intensity of the skin's "grip" on the node of that part of the skeleton. As certain areas will distort when rotated unless the skin weights are correctly applied. In order to get a professionally finished model, the skinning must be applied correctly so there is no distortion or clipping when the model is posed.
I found the more I tried to adjust the skin weights, the more distorted my model became. Although I'm sure with more time and practice I could understand and use this weighting effectively.
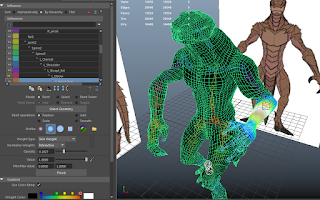
Although this seams like an easy task, It's the part i found the most challenging as I did not fully understand the mechanics. to my understanding the colours indicate the intensity of the skin's "grip" on the node of that part of the skeleton. As certain areas will distort when rotated unless the skin weights are correctly applied. In order to get a professionally finished model, the skinning must be applied correctly so there is no distortion or clipping when the model is posed.
I found the more I tried to adjust the skin weights, the more distorted my model became. Although I'm sure with more time and practice I could understand and use this weighting effectively.

Saturday, 16 April 2016
Character: Rigging it up to 11
In the closing day of the project, I realised that my models would likely not be textured for the submission, but I would still submit my models and what I had. The important part was getting them into the game, And that means I would need to learn how to rig- fast.
After a few hours of the early morning spent on tutorials, I finally understood the basics of HumanIK rigging in Maya, and created a skeleton for my characters.


I gave each object a tinted lambert material and exported characters to my programmers and hoped for the best. it was all I could do given the time left before the deadline.
I feel as if I was re-making my models and going into far too much detail considering the stylistic design of the game. If I had made a more stylized character with slightly less intricate detail, I might have been able to finish and texture my models and make the variations I intended to do from the beginning. Although I am still proud of the progress I have made in 3D modeling through this project and intend on learning more about rigging and animation as I and still confused and fascinated by the subject.
After a few hours of the early morning spent on tutorials, I finally understood the basics of HumanIK rigging in Maya, and created a skeleton for my characters.


I gave each object a tinted lambert material and exported characters to my programmers and hoped for the best. it was all I could do given the time left before the deadline.
I feel as if I was re-making my models and going into far too much detail considering the stylistic design of the game. If I had made a more stylized character with slightly less intricate detail, I might have been able to finish and texture my models and make the variations I intended to do from the beginning. Although I am still proud of the progress I have made in 3D modeling through this project and intend on learning more about rigging and animation as I and still confused and fascinated by the subject.
Wednesday, 13 April 2016
Character: Clothing
Going back to the protagonist, I needed to model some basic clothing - even if I was unable to model the intricate armour that had been designed for the characters late into the project. I duplicated and extruded the faces around where I wanted the clothes to be, then deleted and edge-loops that I thought were unnecessary in order to reduce the amount of Tris (as it was starting to cause slowdown) - The trousers and shirt were relatively simple. extruding the faces out from the body with some tweaking.
However the character was designed with a long coat. Although this would be a nightmare to animate especially for someone as new to the subject as myself, I modeled it. I made a sectioned cylinder and rotated and scaled the rings to get the basic shape of the flared coat.

The coat was taking shape, but I needed to add sleeves and layer the clothes ontop of the base model and other garments. This would prove to be the difficult part as I spent a lot of time having to push back verts that had clipped through to the layer above.
However the character was designed with a long coat. Although this would be a nightmare to animate especially for someone as new to the subject as myself, I modeled it. I made a sectioned cylinder and rotated and scaled the rings to get the basic shape of the flared coat.
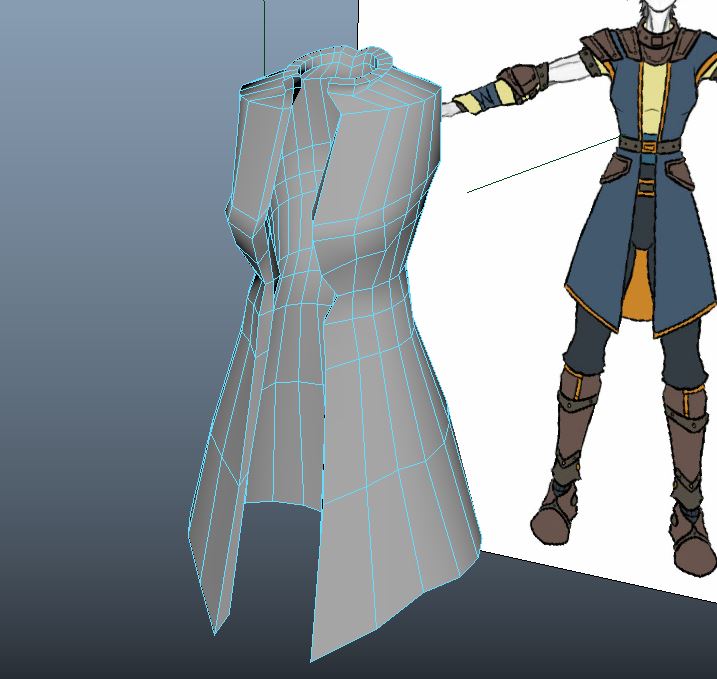
The coat was taking shape, but I needed to add sleeves and layer the clothes ontop of the base model and other garments. This would prove to be the difficult part as I spent a lot of time having to push back verts that had clipped through to the layer above.
Tuesday, 12 April 2016
Character: Lizard Creature
After getting the design for the Lizard creature, I decided to start modeling it straight away as I I found it far more interesting than the human character. The broad shoulders and square face were more akin to my personal beast illustrations and I felt far more comfortable modeling it as i had a better understanding of how it would look in 3D space.
Following an old Dragon-Drawing tip from a book I got as a kid, I started with a box to make sure his form followed a stronger, bulkier build. Extruding the faces and adding sub divisions expanded the shape from the torso to the head and tail, then I extruded the shoulders and legs from the body separately.

This creature had better topology and form than the human character, although I'm uncertain if that is due to preference of character or the skill I have gained from modeling the protagonist.
Following an old Dragon-Drawing tip from a book I got as a kid, I started with a box to make sure his form followed a stronger, bulkier build. Extruding the faces and adding sub divisions expanded the shape from the torso to the head and tail, then I extruded the shoulders and legs from the body separately.

This creature had better topology and form than the human character, although I'm uncertain if that is due to preference of character or the skill I have gained from modeling the protagonist.
Sunday, 10 April 2016
Character: Dreading Locks
I was nervous of modeling hair from the offset, as it's something that I've never attempted before.
I started by selecting faces on top of the head where the hairline would be, then duplicating and extruding out this simple shape on which to build upon. After attempting to merge shapes to make the hair, I found that extruding stands from the mesh was more effective, and complimented the stylised shape in the reference.


I started by selecting faces on top of the head where the hairline would be, then duplicating and extruding out this simple shape on which to build upon. After attempting to merge shapes to make the hair, I found that extruding stands from the mesh was more effective, and complimented the stylised shape in the reference.


The base of the hair was starting to take shape, but I was encouraged to smooth the mesh to make it more visually appealing.

I used a coloured texture to help define the hair from the head, and adjusted verts by hand as there where many that were too close together and could clip through the faces on the other side of the shape.
Saturday, 5 March 2016
Character: Face Remodeling
After creating my new mesh, I was far happier with it than the previous one, it looked a lot more organic without the sharper edges from the lower-poly model.


However, something that I was not entirely happy with was the face. The human face is a complicated thing to model due to the proportions and detail involved. Therefore I ended up re-making the face several times before getting a result I was happy enough with to use for now.

Also, my materials got mixed up in the process of tidying up my materials (as I had to re-apply the textures for the reference planes several times) and my default texture was from one of the reference images. it looked... Weird. But kind of cool.

Sunday, 28 February 2016
Character: Starting over.
After speaking with my group and my tutor, I discovered that the method of modeling I had been following (with the intent to smooth it closer to the end) was not efficient or particularly usable.
I had one of two options: To try and use the mesh I had made and edit it into a higher resolution model by adding edge loops and smoothing. Or I could make a second attempt and learn from my mistakes.
I decided that a second attempt would be more beneficial, as it would allow me to practice my modeling and save me time trying to iron out errors in my first mesh.
I had one of two options: To try and use the mesh I had made and edit it into a higher resolution model by adding edge loops and smoothing. Or I could make a second attempt and learn from my mistakes.
I decided that a second attempt would be more beneficial, as it would allow me to practice my modeling and save me time trying to iron out errors in my first mesh.
Monday, 15 February 2016
Character: Smoothing Things Out
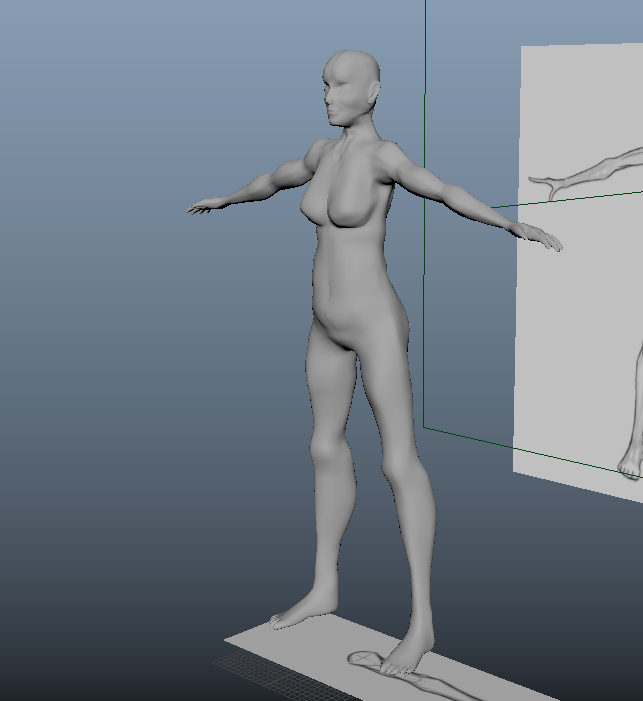
I found that smoothing my model had the tendency to thin out the limbs as well as lose some of the definition in places such as the face and hands. to combat this I used the Crease tool to sharpen the edges around certain points. Retaining the edge even after smoothing. The smoothed model is a lot more eye-pleasing than the smoothed mesh.


Tuesday, 2 February 2016
Character: Starting the Base Model
I used a reference from the internet alongside photo reference while waiting for the concept of the main character, So I could start modeling a basic shape that would become the main character. This took some time as I'm not very efficient with Maya but I hope that this role will help develop my 3D modeling skills over the course of the project.
What I will need to do is model, texture and rig at least two characters (a human and a monster) but I intend to modify these models to create NPCs and enemy variants.

I hope to get the finalised model sheet soon, as I will not be able to accurately model the character.
What I will need to do is model, texture and rig at least two characters (a human and a monster) but I intend to modify these models to create NPCs and enemy variants.

I hope to get the finalised model sheet soon, as I will not be able to accurately model the character.
Friday, 1 January 2016
Character Artist: Post 1
Character Artist
As all other roles had been taken, it was left to me and Wesley to choose between character artist and concept artist. My preference was in concept, but I reluctantly took the challenge of rendering a character.
As all other roles had been taken, it was left to me and Wesley to choose between character artist and concept artist. My preference was in concept, but I reluctantly took the challenge of rendering a character.
Subscribe to:
Posts (Atom)