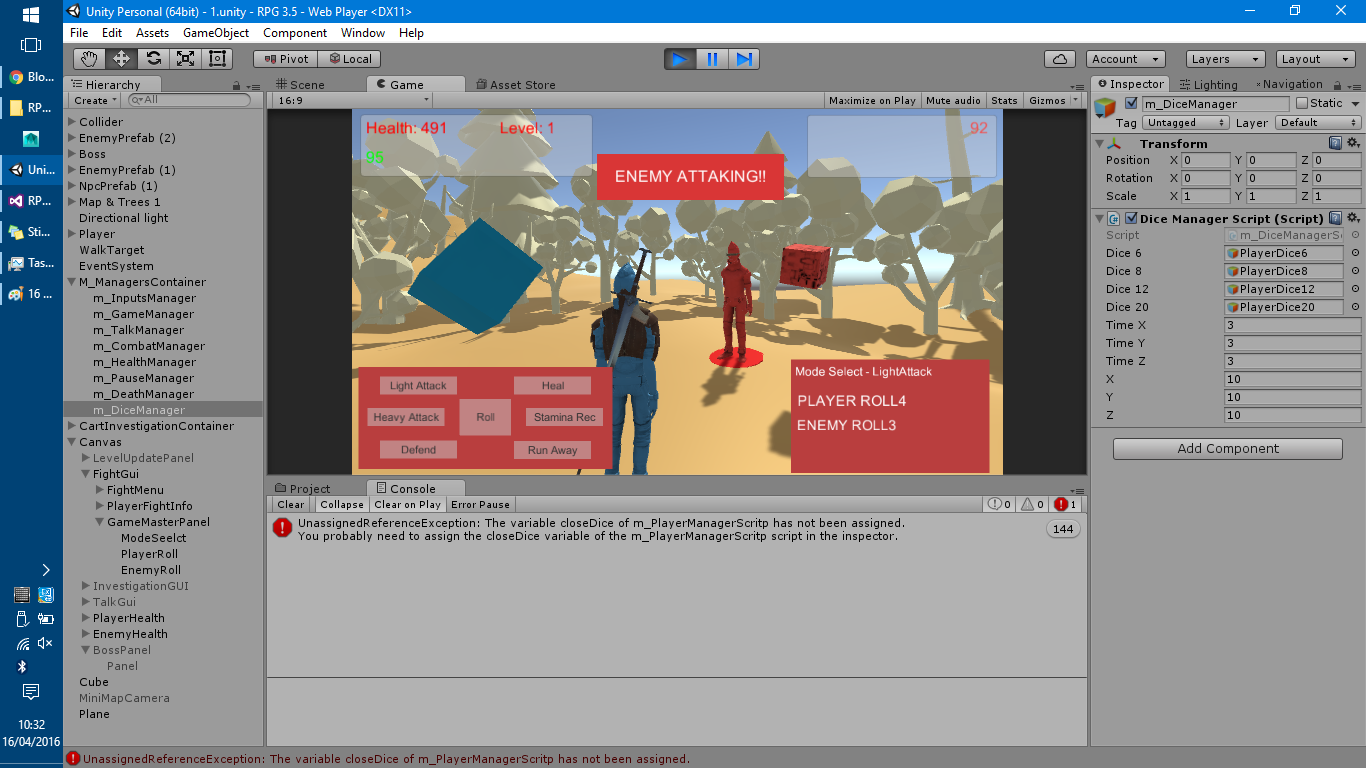
Going from version 2.0 to 3.4 I have solved so many problems, I managed to make a system that allows the player to combat numerous enemies( only one at a time though ), I made numerous prefabs: enemy, enemyDice, Npc and ragdolls for the player, Npcs and enemies, along the way I ran into many problems and solved many problems.

The game has reached version 3.4, with each new version I either fixed problems and improved the system or I overcame something I was afraid I wont understand, this final version works with the state machine style of game play switching between playing, combat, talking, investigation and dying.
The Combat is managed by a few scripts: the player manager keeps track of objects colliding into the player such as an enemy, and now the enemy dice(explained later down), when an enemy comes into the player collider a fight is triggered, the appropriate panels are activated nd things are set in motion.
The player manager starts the fight but it is the combat manager that does all the heavy work like button activation and calculations:
when a fight begins the player is able to choose a fighting mode from the six visible in the images below, once a mode is selected the roll button becomes active, when the player roll all the button become un-intractable so that the player does not start more than one coroutine and break the game, things are under control, the combat manager rolls for the player and calculated an outcome for the selected mode, while all of this is happening a panel above the player character gives the player feedback on the situation, after the player move an if statement asks if the enemy health is above zero, and if it is the enemy rolling begins, if the player is defending then their defence will be attacked, but if the player made a normal move the roll will decide if the enemy is attacking or healing.
Things like the low stamina warning was done by a simple Coroutine that plays the low stamina warning and then turn off the warning after a few seconds.
The scripts were reworked slight so that it would be easier to understand and easier to apply new scripts that would make use of them.
After this the game files were put into 3.5 just in case anything goes wrong with the additions of environment or character assets.
I added a manager script that manages the dice that float by the player, the dice will rotate slowly when idle, rotate quickly when rolling and rotate very slowly after rolling, I want to balance the difference between all three so that it provides satisfaction just from seeing the dice change speed.
I then attached the player manager to this script and when an object tagged 'EnemyDice' enters it will be controlled by this script, so that both the player and enemy dice rotate during moves, tried and tested this is fantastic.
During combat the mini map is disabled and a panel appears showing the current rolls and selected mode.
During the making of my part of the game I did use many tutorials, some of these things I already understood completely and some were completely new to me.
One thing that made made almost afraid was the state machine, it probably made me scared because it didint work properly and I didint understand why, but one day I found the answer, I made a number of voids that were made solely to change the game state and this worked properly, some tutorials like this one explained the purpose and functions of a state machine.
Enemies and player looking at each other
One crucial part of the combat and its immersion and nice looks was the orientation of the player and enemy during combat, the solution was to use the look at command I found in the unity library, with this tutorial I made the m_CombatManager for anything to do with the fighting, and in that manager script I made an InputUpdate void that is updated by the m_GameManager state machine while it is in the Fighting state the player and enemy will look at each other.
Saving data from scene to scene
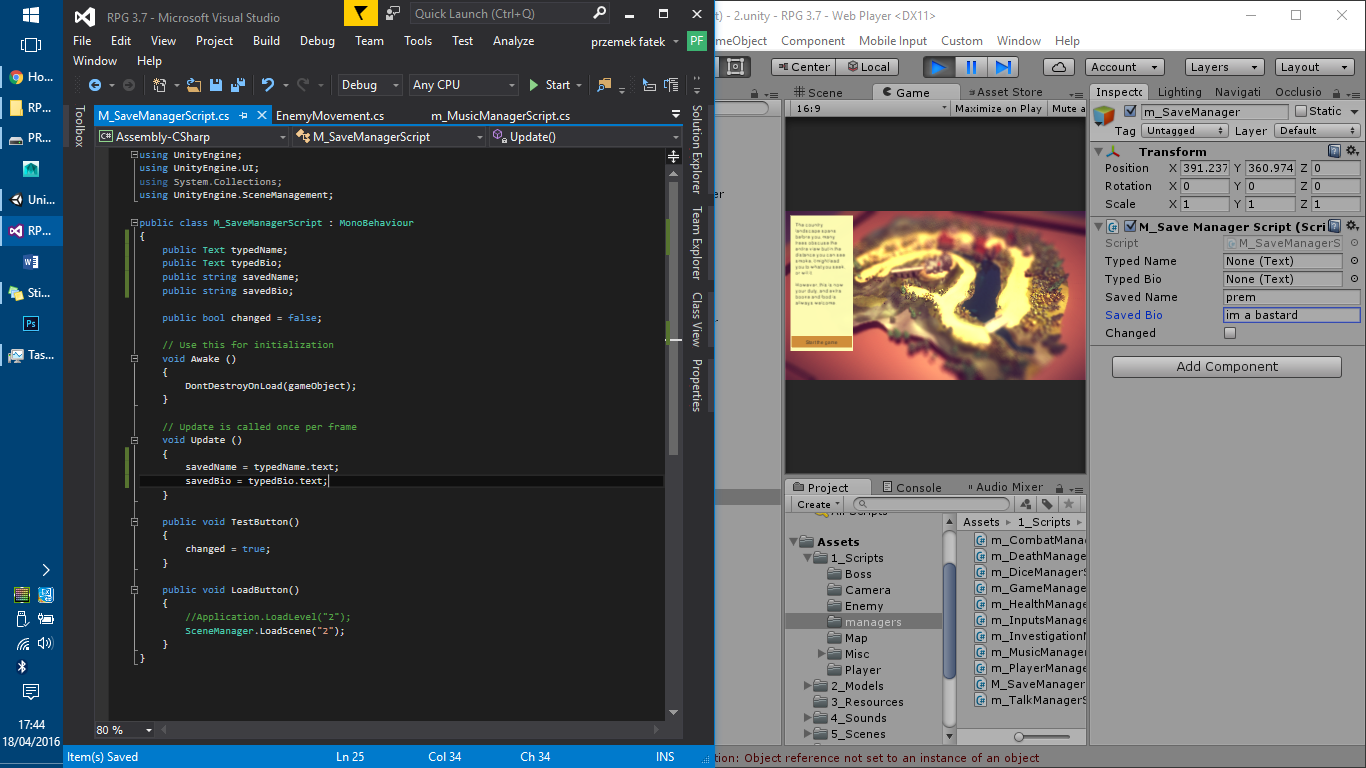
James had made the first scene with character creation and I was working to create the main game level and then work with the others to put in their work, I made one main script that helped carry over the character creation data into the main game and present it on the character sheet.
I made the m_SaveManager which took the typed in filed text data and altered the save manager data, the manager was then set to not be deleted, the unity library of tutorials helped here, the save manager is thrown into the main game on load and the character sheet is then set to the save manager data by using the game manager script.
Ragdolls and prefabs
Another thing that was completely new to me was ragdolls, luckily creating one was easily done and the in engine rag doll creator was easy to use, once I made a ragdoll I created a prefab for it, soon the game had a player, enemy and npc ragdoll in their respective colours.
Throught this I was able to make the enemies so that they could be plopped anywhere into the scene and they would work with the scripting, tried and tested I made the perfect enemy prefab for this game.
Over all script explanation
In my side of the game I have made quite a few m_ manager scripts and other scripts that all work in unison in one way or another, I will now explain what they do, how and talk about any tutorials I used.
I am explaining how these scripts work when I made them before they had additions from James' scripts.
m_GameManagerScript
The game manager script is one that came from Ewan's tutorial and I then changed it and added to it to make it suit the games requrements.
It is the manager that coltrolls the main components of the game, when the game is begun it changes the state from the Intro State to the Playing state, each state in the game will then update its respective voids which in turn update other scripts that branch off from this script.
The game manager also changes the camera position and rotation, for each game state there is a different camera position.
m_InputsManagerScript
The inputs manager works alongside the game manager and scripts also branch from this manager,
it controlls the hover and click functions of the mouse and changes the cursors gui, it also contains some of the more important buttons that appear in the game, this scripts changes the game state on certain clicks like the investigative object.
m_PlayerManagerScript
The Player manager is as important as the state mashine, thanks to this manager the game works: the player manager works with a circle colider around the player, this collider then grabs every enemy enemy dice through a collider function and controls them in other scripts, the player scrips and collider enables the functions of other scripts:
- In the combat script the grabbed enemy will allow the plaer to look at them, when killed the grabbed enemy object will be destroyed and replaced with an enemy ragdoll.
- The grabbed enemy dice rotation and rotation speed will be controlled in the dice manager script, which is then controlled by the combat script.
m_InvestigationManagerScript
The investigation manager is a very simple script, it changes the camera positions seperately from the game manager, each investigated objects adds 1 to the investigated objects and once enough points appear the player can conclude the investigation and end it.
m_CombatManagerScript
The combat manager is another major script, it takes care of all the calculations in the combat, I changed the final script to make it easier to apply other scripts by replacing numbers with set values such as Light Attack having a number, this then made it easier to alter.
Besides for calculations the manager takes care of things like the low stamina message that appears during combat.
the combat manager works by two coroutines, one for the player rolling, and if the enemy is still alive by the end of the players coroutine the enemy rolling coroutine starts, while all of this is happening the fight panel buttons beome in active so that the player does not start more than the one coroutine at once.
m_TAlkManagerScript
talk manager is a series of buttons that change text and set buttons active and in active in order to create the illusion of a conversation, this one was easy but confusing to make since there were many buttons.
m_DeathManagerScript
death manager works with the health scrip and at any point that the player health reaches zero or below it is set to default to avoid showing minus health, once the player health reaches zero the death manager event are set in motion, the player character is replaced with a player ragdoll and a coroutine starts, after 3 seconds the death panel appears telling the player they died, this panel shows two buttons, restart and main menu.
m_SavemanagerScript
This script is a very basic script it copies bits of text from the main menu gui and saves it, this manager is then not deleted and goes over to the main game level and alters the character sheet displaying the previously written information.
m_HealthmanagerScript
The health manager contains and manages the health and stamina numbers, it contains the numbers to be altered and changed by other scripts.
m_DiceManagerScript
In the dice manager I made all the dice that the player has and the enemy dice spin at different speeds
BossScript
the boss script merely increases the enemy health and is sset ontriggerentrt
DayNightCycle
RotateXYZ
the day night cycle and xyz rotate scripts are pretty much the same script altered to suit the different needs, day and night rotates two directional lights that change the day and night cycle in game, both scripts also can change the speed of the spinning, his was usefull when making the different scenes.
FireFlicker
the fire flicker script remained unused but it changes the intensity of the light it is attached to
RAgdollDestroy
another unused script was the ragdoll destroy there was no time to finish it